Custom Search

Mustaqbil

Friday, April 9, 2010

How To Install Irrigation: Pipes and Fittings

Step 1: Lay Out a Plan for the Irrigation System


Determine any potential obstacles -- such as trees -- that may block sprinkler patterns, as well as curves in the landscape design that might require special attention. Carefully measure property boundaries and record the numbers on a diagram of the layout. Use graph paper for the plan to allow the irrigation system to be drawn to scale and accurately plotted. Draw in the street, driveway, sidewalk, and house, as well as landscape elements such as flowerbeds, trees, etc.

Step 2: Pick the Best Irrigation System
Once the property layout is on paper, it's time to evaluate the various system components and sprinkler heads available and determine the best way to pull it all together. To start this process, learn the basic elements of an irrigation system and their respective features: Polyethylene pipe (Image 1) is the recommended choice for most irrigation systems. Flexible, lightweight, and highly durable, it's often referred to simply as "poly" (pronounced "polly"). While PVC pipe (Image 2) is probably more familiar to most people than poly pipe, it's generally not the best choice for irrigation systems. Its rigid composition and lack of flexibility can make it difficult to work with, especially in applications where curves and corners require a pliable material like poly. (The importance of flexibility will be evident in the upcoming installation.)

Step 3: Learn About the Installation Materials

Next, learn about the basic fittings used for a typical system assembly. Like the flexible tubing, these components are molded from polyethylene. Featured pieces include: The straight coupler (Image 1). This fitting is used to connect two pieces of pipe that meet at a certain point or to extend a length of pipe that's too short to reach the necessary area. The poly plug (Image 2). Shaped, appropriately, like a stop sign, the poly plug is used at the end of a pipe length to stop water at a designated point. The elbow coupler (Image 3). This piece is sometimes referred to simply as a "90", since it creates a 90-degree angle in a system of pipes. In short, it's used to change the direction of the water, allowing the system to turn a corner. The T-coupler (Image 4). This fitting is designed to join together three pipes at one intersection, either coming off a main line or leading to a valve. To control the release of the water into the pipes, electronic valves (Image 5) are integrated into the system.

Step 4: Create a Mock-Up

To illustrate how the valves will work with the pipes, create a T-formation mock-up of a section (Image 1), and connect with a T-coupler fitting. (The top pipe of the "T" sample represents the main line.) Coils of wire on top of each valve (Image 2) -- known as solenoids -- will connect them to the individual zones. Finally, a programmed clock will be wired to all valves in the system, activating them at the appropriate, pre-set times. Once signaled by the clock, each valve will open, letting water into its corresponding zone. In turn, the water will prompt the sprinkler heads to pop up and begin spraying their designated areas.


How to Build a Trellis Arbor and Gate

Step 1: Remove the Fence Section


Instead of removing individual boards from the fence to accommodate the trellis, use mallets and hammers to knock the boards away from the posts and remove them in sections. Use mallets and hammers to remove individual boards, keeping them as intact as possible so they can be reused. Remove the posts that are in the way; the team used a utility loader with a bucket attachment to remove the posts and the concrete holding them in place.

Step 2: Dry-Fit the Trellis Pieces

The arbor and gate kit includes all of the pieces already cut to size. Check the parts against the instructions and dry-fit the pieces to make sure everything is included and fits properly. Use clamps to help hold the pieces in place for the dry-fit.

Step 3: Assemble the Trellis Top

Position the supports for the eave or top of the trellis on the ground. Assemble the eave by attaching the crosspieces; make sure to follow the instructions and use any aids provided, such as spacer blocks to make sure pieces are properly positioned. Attach the pieces with screws, countersinking the screw heads.

Step 4: Hide the Screw Heads

Apply a dab of wood glue in each screw countersinks and insert a wood peg in the hole to hide the screw head. Place a small block of wood over the peg and tap it with a hammer to seat the peg in the hole without denting the wood. Wipe away any excess glue and sand the peg flush with the wood. Repeat for all of the screw holes.

Step 5: Attach the Trellis Panels

Follow the manufacturer's instructions to fit the panels together. Run a bead of wood glue along the edge of each piece and press together, reinforcing with countersunk stainless steel screws. Fill the screw holes with wooden pegs.

Step 6: Assemble the Trellis

Move the trellis into its final position and make sure it's level. Use blocks of wood under the posts as needed to level the unit. For this project, the team dug a trench under one side of the trellis and braced the wood with a 4x4. Dry-fit the eave on top of the trellis, then attach it with wood glue and stainless steel screws.

Step 7: Attach the Gate

Use hinges to attach the gate to the trellis. Make sure the trellis is level and plumb so the gate swings properly.

Step 8: Install the New Posts and Fence Sections

Determine the position for the new posts so that they line up with the fence and will support the arbor trellis. Dig new post holes, place the new posts in the holes and check for plumb and level. Add concrete to the holes to hold the posts in place. Attach stringers from the existing fence to the new posts. Cut the fence boards as needed for an attractive transition from the fence to the arbor trellis and attach the boards to the stringers.

How to Maintain a Healthy, Weed-Free Lawn

Step 1: Remove Existing Weeds


A few weeds are inevitable in most lawns. Pull weeds, roots and all, by hand or with a handheld weeder (three good types are: fishtail, leverage or Japanese) or hoe (either a garden or stirrup hoe will work). If the weeds are out of control, use an herbicide such as glyphosate for direct application to weeds or apply a weed-and-feed product to the entire lawn; follow the manufacturer's recommended application instructions. Be aware that these products are effective only when the weeds are properly identified and the product is applied at the right time of year.

Step 2: Dethatch the Lawn

Thatch, or the matted accumulation of organic debris between grass blades and roots, can cause dead patches in turf and open spaces for weeds to grow. Inspect the lawn for a one-inch layer of thatch. Use a thatching rake or power dethatcher to remove thatch. Afterwards, the lawn will look terrible, but it'll recover in about three to four weeks.

Step 3: Aerate the Lawn

Inspect turf for compaction problems. Dig a square-foot section of the lawn and examine the roots. If the roots don't extend deeper than 2 inches, then the lawn needs to be aerated. Water the lawn one to two days prior to aeration. Run a rented core aerator over the lawn once. Apply compost or sand over the aerated lawn.


Step 4: Apply Grass Seed to Bare Spots

In early spring or early fall, overseed a lawn with cool-season grass seed such as rye, fescue or Kentucky bluegrass, and overseed a warm-season lawn with Bermuda or Zoysia grass in early summer. For an even application of seed over the lawn, use a broadcast seed spreader. Water the seed to help it establish.

Step 5: Mow Grass Appropriately

A healthy lawn is denser and better able to resist weeds than a neglected one. Don't scalp the lawn; remove only about one-third off the top of the grass. Set the height of the mower deck so that the grass is about 2-1/2 to 3 inches tall. If the grass is taller, it helps to shade out weed seeds and prevent them from germinating. Alternate your mowing pattern by mowing at a 45- or 90-degree angle from your last mowing direction. This helps prevent soil compaction and also helps grass grow upright. Keep mower blades sharp.

Step 6: Water and Feed Grass

Provide adequate moisture to the grass, especially during periods of heat and drought. Apply turf fertilizer periodically throughout the year; follow the manufacturer's instructions.

Sunday, March 28, 2010

How to Grow Cherries

Sweet cherries are great for eating fresh, while tart ones are best for baking. Both can successfully be grown in many parts of the country.

Step 1: Purchase Cherry Trees


The two basic types of cherries are sweet and tart. Sweet cherries are great for eating fresh, while the tart ones are best for baking. To produce fruit, most cherries require another tree nearby for cross-pollination. Tart cherry trees are adaptable to a broader range of climates than sweet cherries. Popular sweet varieties include Black Tartarian and Stella. Popular tart varieties include Balaton and Montmorency.

Tip: As a general rule, sweet cherries grow best in zones 5 through 7, while tart cherries do best in zones 4 through 9.

Step 2: Prepare the Site

Cherry trees need at least six hours of full sun a day in order to produce fruit. Cherries also need good soil drainage in order to thrive. If the site is heavy with clay, amend it with plenty of organic compost and organic soil conditioners before planting. Tart cherries are more adaptable to a wider range of soils.

Step 3: Plant the Trees

Many cherries are sold as bare-root trees. Shake off any material clinging to the roots and soak the roots in a bucket of water for two hours before planting. Dig a hole the same depth and width as the roots. Place the tree in the hole and fan out the roots. Position the tree in the hole so that the graft union is 3" above the soil level. Backfill with soil until the hole is three-quarters full. Water well to settle the soil. Finish filling the hole and water again.

Step 4: Water, Feed and Cultivate the Trees

In the first year or two after being planted, cherry trees require regular watering. A layer of light mulch underneath the trees will help conserve water and keep down weeds. A common recommendation is to fertilize cherry trees in early spring with a low-nitrogen fertilizer such as 5-10-10. In many areas of the country, insecticides and fungicides may be required for good harvests.

Step 5: Prune the Trees

The primary reasons for pruning are to encourage a tree to be more fruitful and to open up the tree so that the sunshine can reach most of the branches. The best time to prune any cherry is late winter or early spring. Your local cooperative extension service should have a free brochure on how to prune cherry trees.

Step 6: Protect the Blossoms From Late Frost

Cherry blossoms must be protected from spring frost damage, which can wipe out a year’s crop. If a late frost is predicted after fruit-bud set, place lightweight fabric over the tree to form a tent. Add a small heat source such as a light bulb on an extension cord.

Step 7: Protect the Fruit From Birds

Birds love cherries. As soon as the fruit begins to ripen, cover the trees with bird netting to protect the fruit. Make sure there are no gaps or openings in the netting. Secure the netting to the ground with bricks, stones or other weights.

Step 8: Harvest the Cherries

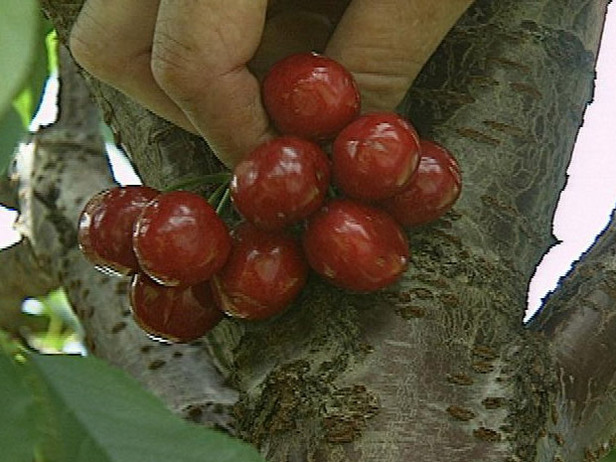
Cherries are among the earliest ripening fruits, being ready to harvest in late spring or early summer. Cherries increase in size until they're ripe. Sweet cherries become firm when ripe. Ripe cherries pull easily off the tree. Sweet cherries are typically picked stem and all. Tart cherries are usually picked without their stems.

Pruning Apple Trees

Fruit trees must be pruned every year, usually during the dormant period. If you don't begin proper pruning early in the tree's life, the result is "alternate bearing," which means that one year's harvest is bountiful while the following year's is puny.


Apple trees are the most common fruit trees home gardeners choose to grow. Pruning is necessary in order to open up the tree canopy to sunlight and air circulation and promote fruit production and a healthy plant. Follow these tips to pruning your apple tree so you can reap a bountiful harvest year after year.

The Ideal Time to Prune Apple Trees

Apple trees should be pruned in late winter, but you can prune into the spring and summer if you must. Avoid pruning in the fall since this stimulates new growth at the same time the tree should be getting ready for winter. The new growth may not have a chance to harden off before cold temperatures and frost hit, which may lead to cold damage on the tree.

Pruning Tools

It's important to have the right tools for the job. Keep the following tools handy for when you prune:

Hand pruners. Use this tool to remove small branches and twigs. You'll probably use this tool the most, so keep them sharp and handy.

Loppers. Loppers have long handles and provide more leverage when pruning larger branches. They're typically used to prune branches larger than the width of your thumb, or about 1" diameter or more.

Folding saw. This tool is useful when pruning limbs larger than 3" in diameter.

Pole pruners. These consist of a blade attached to a long pole and are handy for reaching high branches.

Pruning

The first rule of pruning is to remove any dead, injured or diseased branches. When going to make a cut, look for the branch collar, which is the "wrinkled" part near the base where the branch is connected to the tree trunk. This portion of the tree has all the cells necessary to heal wounds. Never cut into the branch collar when pruning. Instead, make the cut just above the point where the branch collar flares.

During the first couple of years after planting, allow the tree to grow its roots and establish itself before doing any pruning. It's good to prune away dead, injured or diseased branches immediately after planting up to the third year.

Begin heavier pruning in the third year of growth. First, remove any dead, injured or diseased branches. Then moving up the tree, look for branch angles, or scaffolding branches which are branches that grow from the main trunk, preferably evenly spaced, at 45- or 50-degree angles. Leave these scaffolding branches for the basic framework of your tree.

Fruiting buds are dark-colored, wrinkled wood that grows from scaffolding branches. Leave these small branches since they're the ones that produce fruit. Trees begin to form fruiting buds at around three years of age.

Vegetative buds are similar in appearance to fruiting buds, but they're not so wrinkled and dark. These buds form leaves and new branches.

Remove any competing branches that will cause problems for the tree. Sometimes these branches create a hollow where water can collect and encourage rot. Look for branches growing toward the inside of the tree, and remove them to improve air circulation. When you remove a branch or a limb, the bud directly under the cut will take over and grow. For this reason, you should cut above outward-facing buds.

A fruit tree should have only one central leading branch. Don't allow two leader branches to form, or the tree will become weak. Identify the healthier or stronger leader, and remove the other. The ideal apple tree has one central leader surrounded by evenly spaced scaffolding branches that have plenty of fruiting spurs.

Tip: If your apple tree is lacking the scaffolding branches, or the lower branches that are actually good on an apple tree, you can force them to come out. Find a bud and use a knife to make a nick a millimeter above and below it. Then cut the notch between the nicks completely out, making sure to cut through the bark and the green layer beneath it. That will force the tree to grow a new branch on the spot.

Thinning Fruit

During seasons of good weather, the apple tree may produce an overabundance of fruit, causing fruit "crowding" on the branches and resulting in smaller-sized apples. In order to grow tasty, normal-sized apples, it may be necessary to thin out the fruit. Generally speaking, fruit should be spaced about 6 inches apart along the branches; thin out closely grown apples and select out the smaller-sized ones in favor of the larger fruits.

Growing Citrus Trees

Regardless of whether your climate is tropical or wintry, learn how to grow your own citrus trees at home.

Citrus plants offer a wide array of juicy fruit, including oranges, lemons and grapefruits. You can grow your own right at home, even if you live in a colder climate. Here are some helpful tips for growing these tasty trees.


Freeze Protection

All citrus fruits are warm-weather plants that need protection from frost in cold-winter areas. If frost is predicted, move them inside if you live in a climate with prolonged cold temperatures and freezes. In milder climates further south, protect citrus trees from frost by using a floating row cover made from light landscape fabric. You can also use a bedsheet, piece of burlap or even newspaper. Provide some sort of support to prevent the covering from resting directly on the leaves, or they may freeze to the cover and become damaged in spite of your efforts. For small trees, an inverted tomato cage works well for support. For larger trees, use bamboo stakes. Use bricks to keep the wind from blowing away the covers.

Feeding Citrus Trees

Use a fertilizer formulated especially for citrus, as these plants have special requirements and prefer nitrogen and phosphorus. Follow the directions on the label exactly. If you live in a frost-prone area, fertilize after the last spring frost and stop fertilizing altogether by late summer. In rainy areas nutrients leach out of soil more quickly, so frequent smaller feedings are appropriate. Citrus plants may drop flowers if they're getting excess nitrogen.

Citrus Tree Maintenance

Citrus trees require a rich, fast-draining soil. Keep the soil moist but not wet at all times. Use a three-inch layer of mulch to cover the soil surface to prevent moisture loss. If your plants have yellow leaves, check for scale insects, which look like bumps on the stems and scrape off easily with your fingernail. If you find scale, use an insecticidal soap for control.

Growing Citrus in Containers

If you'd like to grow citrus trees but live in an area where they won't overwinter, why not grow them in pots? You can bring them indoors when it's cold and move them outside during warmer temperatures. To grow a citrus plant in a pot, choose a dwarf variety. Place a layer of rich, fast-draining potting soil in the bottom of the pot. Set the tree in place, and check the top of the root ball for correct planting depth. The top of the root ball should be two to three inches below the rim of the pot. Fill the pot with potting soil, firming gently. Apply a light layer of soil on top of the root ball. Move the potted tree to a location in the warmest, sunniest part of the garden, and water well. At the threat of frost, move the pot to a warm, sunny location indoors.

How to Build a Garden Storage Bench

Step 1: Create Two Sides


Use a circular saw to cut four 2x6 boards to lengths of 16 inches. Cut two 2x4 boards to lengths of 16 inches. Cut four pieces of 4x4 to lengths of 14 inches. To form each side, sandwich one of the 2x4 boards between two of the 2x6 boards. Position the 4x4 posts at both ends, laying them perpendicular to the boards. Secure with 3-inch galvanized deck screws.

Step 2: Create the Front and the Back

Use a circular saw to cut four 2x6 boards to lengths of 5 feet. Cut two 2x4 boards to lengths of 5 feet. Arrange the boards in the same fashion as with the sides, by sandwiching the 2x4 boards between the 2x6 boards. Attach the boards with 3-inch galvanized deck screws to the 4x4 posts on the side panels.

Step 3: Create the Seat

Use a circular saw to cut three 2x6 boards to lengths of 5 feet-6 inches. The seat will extend over the sides by a few inches. Cut two 2x6 boards to lengths of 10 inches. These are used to hold the seat boards together. Lay the boards side by side lengthwise. Position the 10-inch cleats across the boards near the ends. Be sure to center them so they fit inside the bench box. Secure with 3-inch galvanized deck screws.